In groups: spend 5 minutes exploring each of the following 3D modeling/printing projects:
Consider these projects along with the Book of Fortresses I asked you to explore for today.
- How do the analog and digital interact in this project?
- What new perspectives does it develop?
- What new arguments or interpretations does it advance?
- What new possibilities does it suggest for your future work?
3D Printing and Fabrication
One of the biggest advances in recent years has been the democratization of 3D fabrication through consumer grade technologies like 3D printers, CNC routers and mills, and laser cutters. These tools allow digital 3D models that were previously only viewable through the imperfect 2D interface of a monitor screen or a 3D Virtual Reality headset to be brought into physical reality fairly easily and cheaply.

Plastic Buildings and Wooden Maps
In this class, we are going to explore 3D fabrication by taking advantage of our brand new Makerspace in Anderson Hall, and the expert guidance of its manager, Aaron Heidgerken-Greene.
Last year’s class was able to use the Maker Space to make a hybrid digital/physical 3D model of Carleton’s Campus. This project moved back and forth across the analog/digital divide as we…
…researched the history of the physical buildings on Carleton’s campus to create a digital repository of archival images for each.

… refined a 3D digital model of each building that previous students working with our GIS Specialist Wei-Hsin Fu and our Academic Technologist for Digital Scholarship Andrew Wilson had already made.
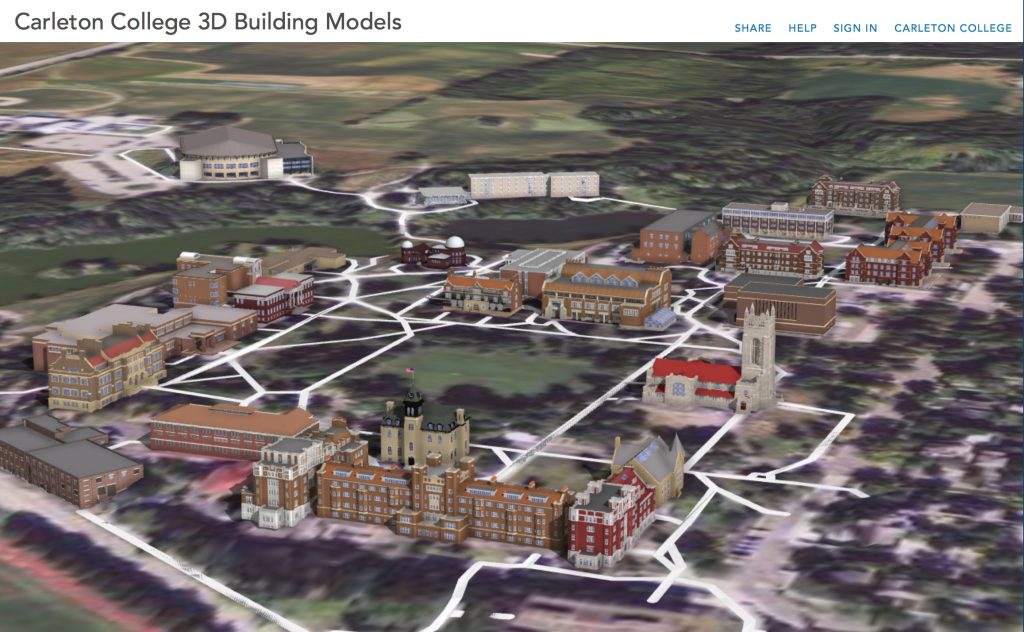
… made a GIS digital map of campus with contour lines for topography, and buildings color coded by use: residential, academic, or other.

… 3D printed tiny physical versions of the digital building models

… and positioned them on a physical version of the digital map laser cut out of wood

… and finally linked the physical product to the digital repository via a QR code in the lower right portion of the map, so viewers can read more about each building and the sources underlying the reconstruction.
Sadly the coronavirus prevented us from doing a similarly ambitious project this time around, but we can nevertheless experiment with individual components of such projects, and you can consider what you might do along these lines in your future work.
ASIDE: Modeling Historic Buildings in SketchUp
For our class project last year used architectural buildings in SketchUp that were made by hand from old photographs. You modeled your own home from memory, but you can use SketchUp to make much more accurate models using the techniques below. Guidance and resources are offered here for those who might want to explore these techniques for their final projects.
Match Photo
SketchUp’s Match Photo technique can be used to create models of historic buildings. Sadly, the tool is no longer available in the free, browser-based edition, but is still accessible in pro and older versions.
The clearest step-by-step introduction I’ve found to the Match Photo technique of geomodeling is several years old but the basic principles still apply. The first link takes you to step-by-step instructions for the process using a photo of a barn as an example, and the next two link to videos walking through the same example.
- Step-by-Step: Match Photo: Modeling from Photos
- Video Tutorials: Part I, Creating a new Photo Match and Part II, Modeling with Photo Match
The two videos below are more recent match photo tutorials that show how to incorporate multiple photos, but skip over some of the basic steps outlined above.
- Video Tutorials: SketchUp Training Series: Match Photo Part I and Match Photo Part II
Extruded Footprint
The other method often used to model existing buildings is the “Extruded Footprint” technique, which has the benefit of georeferencing your model with Google Earth from the outset. Again, this method has been lessened since Trimble acquired SketchUp, but the details are here if you want to try.
If your building is still standing and visible in Google satellite imagery, then this method might work as a starting point for you, but it won’t provide the level of detail we want unless you combine it with matched photos to add the photo textures and architectural elements. The video below offers an excellent introduction to how these two techniques can be combined to produce an accurate model, in the same way we practiced together in class.
- Video Tutorial: SketchUp Match Photo video combining Google Earth footprint and photographs
We are primarily interested in exteriors for this class, but if you find floor plans or architectural blue prints for your building in the archives and want to go nuts and try to start modeling a version with the interior walls, go for it. Here are a few basic resources to get you started.
- Quick how-to overview of the process: How to build a building starting from a floor plan in SketchUp
- Much more detailed and long-winded video on Modeling a floor plan
Finally, masterSketchUp.com has compiled a handy list of 10 tips every SketchUp modeler should know.
Processing a 3D model for printing
In order to print successfully a 3D model needs to be an entirely enclosed solid. That means it needs to be:
- Watertight (i.e. have no holes)
- Non-zero width (i.e. cannot be a true 2D plane)
- Oriented correctly (i.e. cannot have “reversed faces”)
There are many ways to clean an STL file, which is the preferred format for 3D printing, that range from free software to very expensive licensed options through Autodesk and other companies.
We will be using a dedicated free service called Netfabb to optimize for printing
EXERCISE:
SketchUp 201
- Log back into SketchUp at app.sketchup.com
- Load your house project
- Select the building and only the building itself, unselecting any landscape or animal features you may have modeled.
- Right click and choose Make Group

- Copy the Grouped Model to the Clipboard
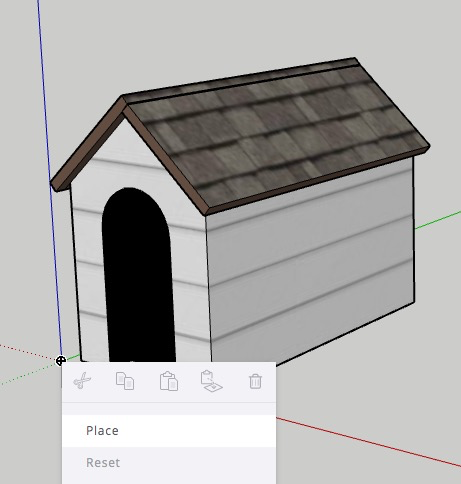
- File > New to make a new model
- Paste the model in, hover over the origin, right click > Place
- Save your new model as LastName_House_fixed
- Export as STL and Save in Google Drive shared folder for class.
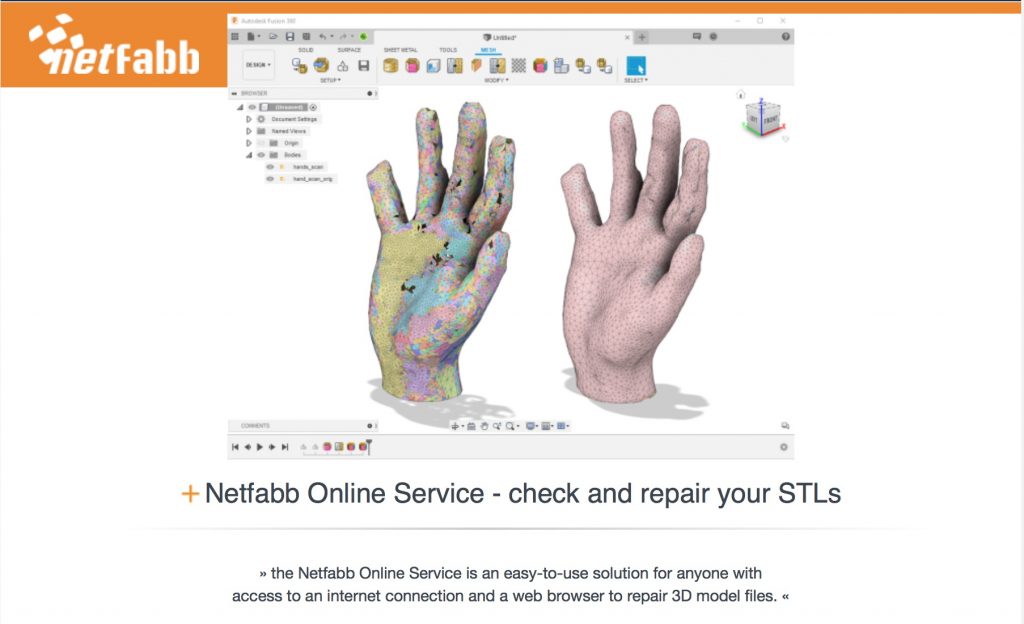
Netfabb Cleaning
One of the easiest free options to quickly get a clean model for printing: the online Netfabb service at https://service.netfabb.com
- Go to the Netfabb service, and log in with Autodesk
- You will need to create an Autodesk account. Do so with your college email address, since you can get free access to many of their desktop applications through our site license and their educational plans.
- Upload your model, e.g. ArenaConcertHall.stl
- Download the cleaned model, e.g. ArenaConcertHall_fixed.stl
- Put the cleaned STL file in your google drive folder
Finally you will make an appointment with Aaron HG at the MakerSpace to print your model.
Sign up for a slot with Aaron HG
NB: If you are off campus and cannot go to the MakerSpace in person, contact me and I can get your model printed for you.
Assignment: Final Project 1 — The Pitch (Thursday Feb 18)
Brainstorm your final project ideas and groups. I will post a Google Sheet for you to start forming groups and ideas.
Form a group of 4-6 and chose or invent a project. Collectively write a blog post on the course blog, stating the following:
- Members of the group
- The definition of the project topic and objectives for what you plan to produce
- The proposed methodology:
- Sources: What data do you hope to use and how do you hope to find it?
- Processes: What tools and techniques will you use to gather sources and store your data?
- What analyses or transformations will you conduct on those data?
- Presentation: How will you present the results and integrate the digital assets you create as an interactive final product?
- The proposed timeline of deliverables
- And finally, a link to one or more DH projects that you think might make a good model for what you plan to do.
Create a unique tag for your group to tag all your posts going forward.
On your own blogs, write a brief message outlining your personal interests in the projects and what you hope it will achieve, and link to it from the groups post
FYI: If some of your face are missing when you download the STL, they are probably reversed. In SketchUp you can select one of the walls that is correctly facing out, right click it and choose “Orient faces” to switch all of the normals to be that direction. Then try to download the STL again.