Web scraping is a form of data collection that focuses on extracting data from websites. Web scraping can be completed manually but is most often done with an automated bot or program that copies the data from a website and outputs it to a local database or spreadsheet. This data can then be cleaned and analyzed for academic research.
Web scraping can be useful for a variety of digital humanities purposes. Here are just a few examples:
- Scraping public Tweets to gather information about people’s thoughts on a particular topic
- Scraping newspaper homepages to compare how different publications are covering the same event
- Scraping a website such as Zillow to analyze the real estate market in different cities and comparing that to socioeconomic metrics
DISCLAIMER: Web scraping private and/or copyrighted data is illegal and unethical. Please ensure you are following a website’s terms of use and scraping only public data; this means you should not need an account, authentication, or special permissions to access the data you want. Examples of private data include private social media posts and profiles, bank information, private messages, etc. If you have any doubts about whether you should be scraping a particular website, please consider finding an alternative way to gather that information. You can read more about the ethics of web scraping here
Creating Your Sitemap
- Install the WebScraper.io browser extension.
- Navigate to the website you would like to scrape. For the purpose of this tutorial, we will be looking at adoptable dogs in the Carleton area on Petfinder.
- Open up Developer Tools. In Google Chrome, select the three dots on the upper right corner of the browser. Click “More Tools” and then “Developer Tools”.

- After selecting Developer Tools, your screen should look like this:

We want to configure Developer Tools so it appears on the bottom of the screen, rather than the right of the screen. To do this, select the three dots in the upper right corner of Developer Tools and where it says “Dock Side”, select the third option (“Dock to bottom”).

- Developer Tools should now appear on the bottom of your screen like so. Select the “Web Scraper” tab all the way to the right of the Developer Tools dock.

- From the Web Scraper tab, select “Create New Sitemap” and then “Create Sitemap”.

Enter your sitemap name. This should be the name of the project and it should be written in all lowercase letters and separated by underscores. Below the sitemap name, enter the URL of the website you would like to scrape. Press “Create sitemap” when you are done.

You have now created a sitemap!
Adding Selectors
- Now that we have created our sitemap, we need to add some selectors. You can think of selectors as the components of the website that you are ‘selecting’ to be scraped. Click the blue button “Add New Selector.”

On Petfinder, the dogs’ photos and information are presented in a grid of boxes (or dog profiles). We want our first selector to look for these dog profiles. This way, the web scraper will know that each box represents one dog.
To do this, we’re first going to enter the information for our selector:
- ID: This is the name of the selector. Make it something intuitive so you know exactly what this selector is looking at.
- Type: This is the type of selector. There are many options, but the only ones we’re going to look at today are “Element” and “Text”. “Element” refers to an HTML element of the website while “Text” refers to textual information. We are going to select “Element” since the dog profiles (the grid of boxes) are a design feature of the website.
- Selector: I am going to describe this in more detail in the next step, but this is the HTML that the web scraper is assigning to this selector. In other words, this is the content of the website that we’ll be scraping. Ignore this for now; we will come back to it in the next step.
- Multiple checkbox: This tells the web scraper whether there are multiple items that it should be looking for. Since there are multiple dog profiles on this page, we are going to check the box.
- Parent selectors: “_root” refers to the web page we listed as the Start URL when creating our sitemap (https://www.petfinder.com/search/dogs-for-adoption/mn/55057). The dog profiles are all located on this web page so we will choose that as our parent selector.

- In the selector field, click “Select”.

While you have this open, click on the website items you’d like to include in this selector. For our example, we’re going to select all the dog profiles. Since you’re just getting started, we are going to make this a little easier by only selecting the part of the profile that contains textual information (i.e. we’re going to exclude the images from our selection).
The boxes should turn red as soon as you click them to indicate that they have been selected. To select multiple boxes, hold “Shift” and click. When you are finished selecting all the boxes, click the green button that says “Done Selecting.”

Now the HTML of the items you selected should appear in the “Selector” field. Click “Save Selector” when you are finished.

Adding Child Selectors
Congratulations, you have created your first selector! However, we’re not finished yet. If we were to scrape the website right now, it wouldn’t return any textual information in our CSV file. To fix this, we want to create selectors for the dogs’ names, age, breed, and distance.
Since this information is contained within each dog profile, we need to create selectors that are child selectors of the dog profiles. This means that our web scraping tool will look within each dog profile and pull out the textual information we want, before moving on to the next dog profile.

- To do this, click the “dog profile” selector. This should bring you to a screen that looks like this:

This displays all the children selectors under “dog profile” (I’ve highlighted the path with a red box). There are currently no children selectors, so let’s make one.
- Click “Add new selector” and create another selector called “name” that will scrape the dogs’ names.
- Type: Instead of an “Element”, this selector is going to be considered “Text” since we are looking at textual information.
- Multiple Checkbox: We are not going to check the “Multiple” box since there is only one name per dog profile.
- Parent Selectors: We are going to choose “dog profile” instead of “_root” this time, which will tell the web scraping tool to go inside each dog profile and scrape it for the dog’s name. It is important to make “dog profile” the parent selector, and not the entire web page, so that all the textual information within each dog profile (name, age, breed, distance) will appear as one row within our final CSV and indicate to us that it is the same dog. Otherwise, all the dogs’ information will appear in one giant column.

- Next, use the Selector tool to select the dogs’ names. You’ll notice that the parent selector (“dog profile”) will be highlighted in blue. You want to select the dog’s name, which should be contained within the parent selector.

When you’re finished, click “Save Selector”.
- Repeat this process to create selectors for the dogs’ age, breed, and distance. Make sure you are configuring each selector to be a Type “Text” with Parent Selector “dog profile”. When you are done, the “dog profile” screen should now look like this:

Scraping the Data
- When you are finished adding all the selectors, we can now scrape our data! Go to the sitemap tab and select “Scrape”.

Select “Start Scraping”.

A miniature screen should briefly pop up. DO NOT close it! If you close it, the program to scrape the website will stop running and you will have an incomplete CSV file. After it closes on its own, you should see a screen that says there is no data yet with a blue “Refresh” button next to it. Click the “Refresh” button.

If all went well, the data you scraped should display. If you are getting null values or some of the fields are empty, one of the selectors probably has the wrong HTML in the “Select” field. Go back to the problematic selectors and re-select the HTML. Then, try and scrape the data again.

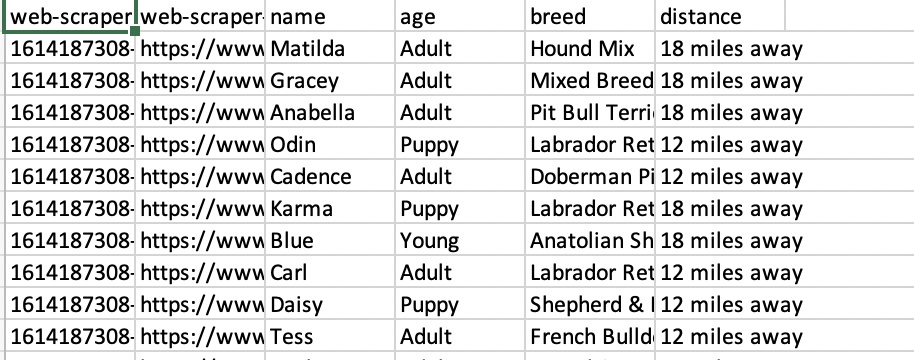
- Finally, go into the sitemap dropdown and select “Export Data as CSV”.

Click “Download Now”.

Open the CSV file.

Read more about web scraping:
Black, Michael L. “The World Wide Web as Complex Data Set: Expanding the Digital Humanities into the Twentieth Century and Beyond Through Internet Research.” International Journal of Humanities and Arts Computing 10.1 (2016): 95–109. https://www.euppublishing.com/doi/pdfplus/10.3366/ijhac.2016.0162
Hi Grace! I like how you broke down the tutorial into manageable steps. Your explanation is also clear and easy to understand.
Hi Grace! This was a super helpful tutorial, I honestly had no clue what web scraping entailed and it has always sounded very difficult to learn, but this made it very simple and accessible!